![]()
![]()

Overview
Children learn new things faster when playing. Allowing children to express themselves through art, crafts, and drawing can enhance their learning experience, help them process the lesson, and apply the story to their own lives. Not only that, but creative expression is simply fun! Artistic activities can be done before, during or after the Bible lesson.
God is creative, and we are God’s creations. Since we are made in God’s image, it only makes sense that humans are creative as well, and children especially enjoy being creative! Using our creativity for God is a beautiful way to honour Him.
Suggested Activities

1. Colouring Pages and Pictures
Materials:
Printed colouring pages; crayons, colored pencils, markers, or other colouring materials
Description:
Don’t get stuck in a rut of passing out pictures to colour each week. Click here for a list of new ways to use the basic, line drawing, colouring-book type of picture.
2. Crayon Resist Pictures
Materials:
White paper, white crayon, watercolor paints, paintbrushes
Description:
Draw a picture on a white paper using a white crayon before the lesson begins. When you paint on the paper, the paint does not adhere to the crayon wax, and a “hidden” picture appears. Click here for written and video instructions.
3. Draw and Tell
Materials:
Paper, pencil or other drawing tool
Description:
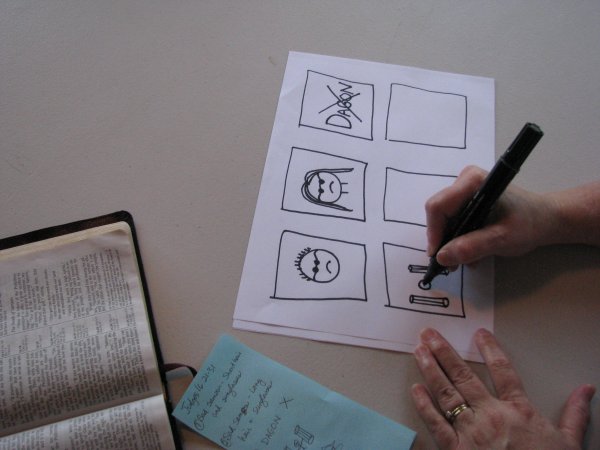
Full instructions for using this idea as a visual aid are found at Draw and Tell Visual Aids Made By Children, but it is also a great art activity. Before the lesson, plan how you will divide the story into “scenes.” Mark off that many numbered squares (or any shapes) on paper so that children will be able to draw the appropriate number of scenes, or print a template from the visual aid page. As you tell the story, ask the children to draw something in each box. For example:
- Scene 1-Joseph lived in Egypt, so draw a picture of something you might see in Egypt (like pyramids or mummies).
- Scene 2-Joseph was Pharaoh’s special helper and wore Pharaoh’s ring (draw a hand with a ring on it), etc.
You will need to do a trial run before the lesson so that you will be prepared. For fun, you can do this same exercise on a chalkboard, on big sheets of newsprint, on the footpath/sidewalk with chalk, in the sand or with any other surface or materials at your disposal.

4. Marble Painting
Materials:
Paper, paint, marbles
Description:
Place paper in a tray and then dot the paper with paint. Move the tray so the marbles roll around in the paint to make colourful marks on the paper. This activity can be adapted to many stories. Marble painting instructions are here.
5. Painting Pictures
Materials:
Tempera Paint or other paint, paper, paintbrushes
Description:
Children love to express themselves by painting pictures. During the lesson, they could paint a scene from the story or one of the lesson’s characters, or you could ask them to reflect on something from the lesson and express their thoughts in their painting. I like to use “Tempera Paint” because it is washable if it gets on clothing. Buy paint from a craft or office supply store or make your own. There are lots of paint recipes online. Here’s an example at fun.familyeducation.com.
6. Play Dough
Materials:
Play-Doh; optional: characters and props for visual aids (see below)
Description:
There are lots of ways to use pliable dough. You can purchase Play-Doh or make your own. There are a number of recipes online. Here’s a selection from teachnet.com
- Before the lesson, decide what characters and props you might need to tell the story (for example, a man, two women, a brick wall, a road, etc). As the children arrive, you can ask them to help you make these characters and items. Set them aside so they will be ready for when you tell the story. You now have a visual aid.
- As an application to the bible story, have the children make characters to act out the lesson they learned.
- As an application to the bible story, have children roll out a flat circle of play-doh to create the shape a face. One way to use this face in the lesson is to have the children create facial expressions with it that correspond to characters you talk about. You could either ask the children to do this for characters in the Bible story, or you could share a scenario related to the lesson. For example, you could share a scenario where a child says mean things to another child at a playground. Ask one child to use the play-doh to show the facial expression of the mean child, and another to show the face of the child being talked to. Encourage the rest of the children to imagine other characters in the scenario (such as a mother, another mean child, etc.) and do the same. Just use your imagination. There are endless applications.
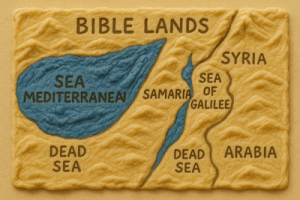
7. Relief Map
Materials:
Map, salt dough
Description:
Provide a map showing the geographical area in the story (or older children can research their own). Use salt dough to make a map of the area. Include hills and valleys as in the map. Here is an example at kidworldcitizen.org.
8. Yarn Picture Outlines
Materials:
Printed colouring page, glue, yarn
Description:
Using a simple pre-printed colouring page or a picture the child has drawn, apply glue on the lines in the picture and then apply yarn.

9. Zentangle for Focus
Materials:
Paper, pen or pencil
Description:
Doodling is freeform and flowing, but “tangling” usually follows patterns. This method of drawing is so simple and repetitive that it frees the mind up to relax and focus. Instructions for tangling during a Bible lesson here.
![]() ©Mission Bible Class 2011-2026. Before copying or reproducing any portion of this website, please carefully read the “Copyrights and Permissions Page.” https://missionbibleclass.org/about/copyrights-and-permissions/ (Not to be sold or profited from in any way.) www.missionbibleclass.org
©Mission Bible Class 2011-2026. Before copying or reproducing any portion of this website, please carefully read the “Copyrights and Permissions Page.” https://missionbibleclass.org/about/copyrights-and-permissions/ (Not to be sold or profited from in any way.) www.missionbibleclass.org