image_pdfimage_print

Never a Truer Word

Do you remember the first words you recognised when you began to read?  The three and four-year-olds that I teach are so pleased with themselves when they begin to realise that they can spell the word B-I-B-L-E.

We work on this skill for quite some time.  Each week we sing the B-I-B-L-E song.   I display the letters, and we point to each one as we sing it.  When I pick up my bible, I point out the letters and say them.

For a while, the children just mimic me.  I can tell that they have not quite figured it out.  Then, one day, it “clicks”.  That’s what happened this past Sunday.  For the first time, one of the children realised that those letters spell BIBLE!

We sang the song as usual, and he pointed to the letters.  But, this time, he then looked at me and said, “That says BIBLE!”.  He then looked all over our classroom, pointing out the word everywhere he saw it.  It was on each bible in the room.  It was on a room poster.  The word BIBLE was outlined on the bulletin board. He was so excited!

Recognising words as we read our Bible is another way of learning.  Pointing out and talking about words like “Jesus” and “forgive” can be life-changing.

I’m always looking for games that help children learn and are adaptable to any lesson. The Bible Wordz game is one of those.

In this adaptable game, children form words from letter tiles. The words relate to words found in the Bible lesson.  Thanks to Tamako Weiss for putting this game together for me.


Supplies:

  1. Individual letter tiles: Use tiles from games like Scrabble or Bananagrams.  Magnetic letters are another good choice. Alternatively, make your own from paper or bottlecaps.    You will need enough tiles to form multiple words
  2. Index cards or paper to create word cards
  3. A flat surface, like a table, on which to play
  4. (optional) 30-second timer
  5. (optional) Prizes.  These can be stickers, candy bars, bookmarks, or inexpensive toys

Preparations:

  1. Collect or prepare letter tiles.
  2. Create the word cards by writing a keyword on each card.

How to play:

  1. After telling the bible story, show students the keyword cards.  Take time to explain the meaning of each word.
  2. To begin the game, the students spread the tiles (face up) on the table surface.
  3. Set the timer for 30 seconds. When the time begins, students try to spell as many keywords as possible before the time is up.
  4. Students can use word grids or make the words individually.
  5. This can be done as a group or as a competition.  If competing, whoever spells the most words in 30 seconds wins.

Ways you can adapt this game:

  1. Ask the children to use a bible and choose the keywords on their own.  They can then create their own word cards and play the game.
  2. Use very simple words for younger children and more complex ones for older children.
  3. Use review questions instead of word cards.  Plan ahead so that you can ask questions that have one-word answers.  Ask the review question, and the students spell out the answer using the letter tiles.
    The following example is from the story Moses Does Not Honour God.
    Question: Who struck the rock twice?  Answer: Moses.
    The first child to guess and spell M-O-S-E-S wins the round.
  4. Skip the cards and timer and play straight from the Bible. Choose a set of verses and form as many words as possible from those verses.
  5. There are many ways you can adapt this game. Choose what is best for your class and students.

Yes, This Counts at Home


The best lessons are not what goes on in my Bible class.  The best lessons are what the children take with them when they leave.

Years ago I was teaching children about the Fruit of the Spirit.  One young child was in total agreement with love, joy, peace, patience, kindness, goodness and faithfulness.  These were great concepts and he loved learning about them and exploring how they apply in church and in school and with his friends.  But I’ll never forget his reaction when I mentioned that the Fruit of the Spirit should also be displayed to our brothers and sisters in our family.

This young man, moments before, had been enthusiastic when talking about these concepts in various other settings.  Now, he looked at me in shock and horror and said, “What! This counts at HOME too?”

This child realised a truth that is for all of us.  It is God’s intention that we apply what we learn to ALL parts of our lives.

Prayer Cards are one way to help children understand this important truth.

I was able to use these recently when teaching about Joseph’s brothers selling him into slavery.  As we explored the tense relationship between Joseph and his brothers I asked the children in my class to consider relationships with their own siblings.  Even if we do not always get along we should want the best for them.  One way to do this is to pray for them.

I supplied paper, scissors and pens.  As we talked about our siblings we wrote their names on cards.  In class we prayed for each one.  Then, the children took the cards home so they could remember to pray for their siblings.

Yes, prayer counts at home, too.

Full instructions for prayer cards


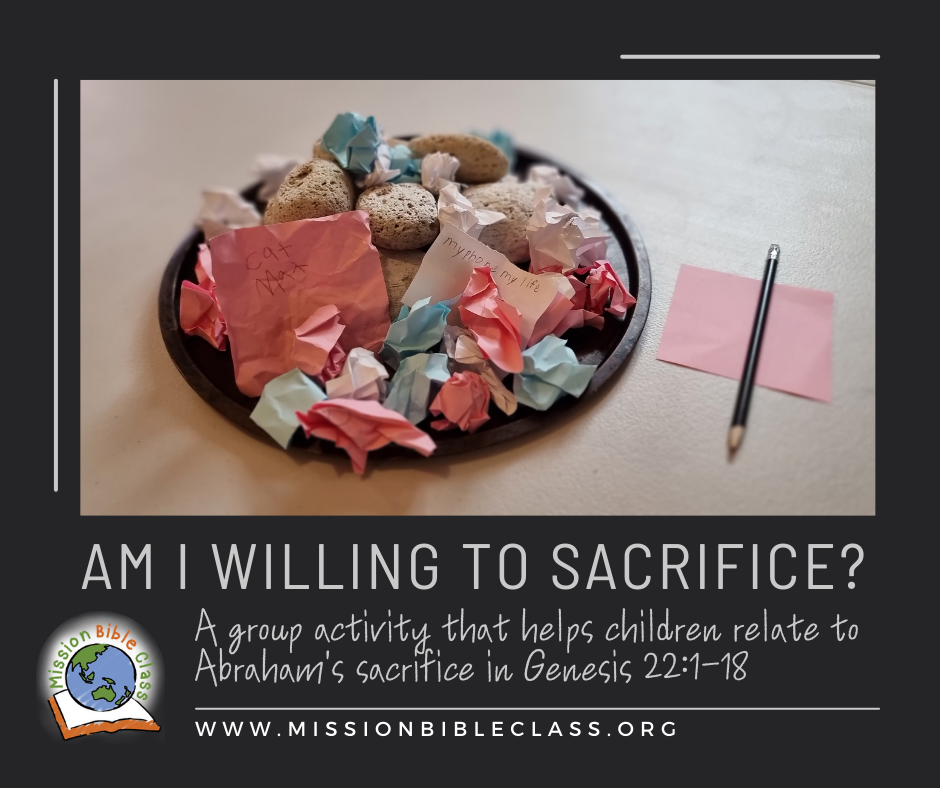
Am I Willing to Sacrifice?

Some stories in the Bible lend themselves to crafts and colouring sheets.  This is not one of them.

There is no way to lightly depict a father being asked to kill and sacrifice his precious son.  The story of Abraham Preparing to Sacrifice His Son is a test of faith like no other.

Of course, even as Abraham was about to carry through with what God had told him to do, an angel intervened and stopped him.  Yes, Abraham had reasoned that God would not ask this unless he planned to bring his son, Isaac, back from the dead after the sacrifice (Hebrews 11:17-19).  But even so, there was a father and a son and a knife.

As difficult it is to comprehend the events of Genesis 22:1-18  they are only a foreshadowing of another time, later in history, when another father allows his son to be sacrificed on a cross.

I wanted the children in my Bible class to contemplate sacrifice.  I wanted them to think about what it would mean to love and trust God so much that we would be willing to give up something we hold precious.  Abraham passed the test and showed he was willing to go to any extreme God asked of him.  Would we pass that test?

The following activity meant a lot to my group of kids so I thought you might like to try it too.  Like Abraham, they will be taken to the very edge in contemplating sacrifice but then they will not actually be sacrificing.

I would suggest you speak calmly and not too fast so that you create an environment of contemplation among the children.

Supplies you will need:

  • Enough paper so that each child will have a few small sheets of paper
  • Pens or pencils
  • Some flat stones
  • Something upon which to place the stones (I used a round metal pizza pan)
  • An empty box of matches

Instructions:

After telling the story of Abraham and Isaac further discuss how God was more important to Abraham than anything or anyone.  Abraham proved that he was willing to sacrifice even the most important thing in his life, his son.  Is God that precious to us?  What would we be willing to sacrifice if we were tested?

  1. Have the children write or draw what is important or precious to them on small pieces of paper.  One item on each piece of paper.  As they write you can already begin asking them whether the thing written on their paper is as important as God.  Keep in mind that this is not about good or bad.  They will be writing down some very good things and people.  This is about whether or not God is more important than even the MOST precious things.
  2. After they have written for a little while then bring out the stones and stack them together to form an altar.  My class was sitting at a table so I placed the stones on the metal pizza pan in the centre of the table.  The children immediately recognised it was an altar.
  3. Now ask the children to think carefully about what they have written on their papers and whether or not they would be willing to give them up (sacrifice them) if God asked them to.
    If they are willing to give it up then have them scrunch up the piece of paper and place it on the altar. Don’t rush this.  Allow them to really consider. More than one child in my class was not ready to “sacrifice” what they had written but, after some thought, bravely decided to do so.  When they place something on the altar be sure and tell them you understand how difficult it is and are proud they have made that decision.  After all, sacrifice is difficult for children just like it is difficult for us adults!
  4. Once the papers are all on the “altar” then bring out the matchbox.  When you seem to be ready to burn all of these sacrifices then open the matchbox to show that it is empty.

At this point continue the conversation to relate the activity back to Abraham.  Here is what I said, “Of course we are not going to burn all of these things.  God wants us to enjoy all of these blessings in our lives.  After all, many of these people and things are very good for us and he does not want us to give them up.

But God DOES want us to understand that HE is more important than even the best things in our lives.  Isaac was the best thing in Abraham’s life but Abraham’s willingness to sacrifice him showed that God was even more important than his beloved son.

In today’s bible lesson we learn that God tested Abraham to see if he was willing to give up Isaac if it was for God.  Abraham passed the test.

And guess what?  Today we have had a kind of test.  YOU were willing to give up your precious things if it was for God.  You showed that God is more important than all of these things.  You passed the test. I am so proud of you.”

At the conclusion of the activity I prayed out loud for each child individually.


The Judges- Round and Round They Go

Recently I taught a set of classes about the time of the Judges.  The background to this time in history is one of a repeating cycle.  To illustrate the idea of a cycle that goes round and round I decided to use a hoola hoop.

Each week, as we studied our way through the Judges I used part of the class time to review this cycle.  Soon the children were able to explain this to the others in the class.  The rattle sound the hoola hoop made as it turned added to the fun.

How to Make a Wheel for Your Class

 If a hoola hoop is not available then use any circular object that can be rotated and used in the same way.  A bicycle wheel, hubcap, pizza pan or a round piece of cardboard would work just as well.

Write each of the stages of the cycle on thick card and tape them to the hoola hoop to form something like a wheel that can be rotated round and round.

Now it is time to review the cycle with the children in your class.  Turn the wheel as you tell about each stage. (To remind you of what to say write the following notes on the back side of the papers.)

  1. SAFE WITH GOD:
    God protected his people as they obeyed him.
  2. FORGET:
    Then the people strayed from God and even started worshipping false Gods.
  3. HURT:
    Because they left God they also left his protection.  When the enemies began to hurt them they had no protection from God.  This was a terrible time.
  4. HELP!
    Finally, after so many bad things were happening, the people realised their mistake and cried out to God for help.
  5. JUDGE:
    Even though the people forget God, God never forgot his people. When his people cried out for help he would send a hero (called a Judge) to save the day and turn them back to him. Sometimes these heroes were soldiers, sometimes they were very clever.  At least once they were a bit wild and crazy (Samson). God knew what kind of judge they needed.And the cycle continues…The judge would bring the people back to a time of safety with God (repeat number one again).  Sometimes many years would pass but then, the people began to forget again…(and this is where you continue to number two and so on).

Stories that Took Place During the Time of the Judges

1_Deborah Deborah the Judge

Gideon and Fleece Gideon and the Fleece

Gideon and Midianites Gideon and the Midianites

4_Birth of Samson The Birth of Samson

5_Samson and Delilah Samson and Delilah

6_Death of Samson The Death of Samson

7_Ruth and Naomi Ruth and Naomi


8_Ruth and Boaz Ruth and Boaz

9_God Answers Hannahs Prayer God Answers Hannah’s Prayer

10_Samuel Helper in Temple Samuel- Helper in the Tabernacle

11_Lord Speaks to Samuel The Lord Speaks to Samuel

Wading Lambs and Swimming Elephants

2016-2-elephant-and-lamb-1


As a Scripture was being publicly read in the church of my childhood I would sometimes watch my grandmother’s finger slide across the page of her Bible.  As a small child I would light up when I could occasionally read a word or two.


There is no other book like the Bible in its importance for people of all ages.  It has always amazed me how God’s Word can seem so simple and yet so complex.  Even when I am reading Scripture as I prepare lessons for infants and toddlers I am often astounded at a new concept that I had never noticed before.

I think Gregory the Great said it best many many years ago when he wrote the following (emphasis is mine),

“Divine speech sometimes stirs up the clever with mysteries, but more often provides consolation for the simple with the obvious. It has out in the open food for children but keeps hidden away the things that fill the minds of the eminent with awe. Scripture is like a river again, broad and deep, shallow enough here for the lamb to go wading, but deep enough there for the elephant to swim”.

Saint Gregory the Great: Moralia on the Book of Blessed Job, Section 4.  Click here for full text.


What a blessing to help lambs wade in God’s Word!  As I teach children I want to be attentive to their stage of development and help them experience God fully.  I usually have my own Bible open on the table when I am teaching so that children can see that I refer to it and respect what God says.

In addition to my own Bible I want children to be very familiar with handling a Bible on their own.  If at all possible I try to have bibles available for the children.  Over the years I’ve developed a few measures for what children of various ages are able to do so I’m sharing them with you here in case you might find them useful in your teaching and at home.


Infants and Toddlers

  • 0-2 Rectangle3Allow the infants and toddlers to hold small Bibles.  These should be inexpensive because they will inevitably, at one time or another, be chewed and pulled apart and the pages torn.
  • Show them how to hold the Bible carefully and how to turn pages.
  • Place a sticker of Jesus inside the front cover so the children can “find Jesus” when they hold their bibles.
  • Hold the Bible in front of each child, in turn, and slide your finger along as you “read” from it.  I usually read, “God Loves Suzy.” (inserting the child’s name)  Or “God loves Mummy.” “God loves Daddy.”


Pre-School (ages 3-5 years)

  • 3-5 Rectangle3Pre-Schoolers can look at pictures in a children’s Bible.  If you do not have picture Bibles then tuck pictures between the pages of a Bible before class.
  • Guide the children in pretending to read along with you as you tell a story or read a verse.
  • Children of this age can learn to spell and write a few basic Bible words.  I use magnetic letters or puzzles to do this.  And of course they are learning to write letters at this age so they really enjoy just writing the letters.  We practice one word over a few weeks until the children have it down.  They are so proud of themselves!
    • G-O-D
    • J-E-S-U-S
    • B-I-B-L-E (song)


Younger Primary School Age (ages 6-7 years)

  • 6-7 Rectangle3Children of this age can learn to recite the names of the 66 books of the Bible. I think it really helps to learn them by singing the songs.
  • With help, children can find a book, chapter and verse in the Bible when given a Scripture reference.  This is much easier to accomplish with a few children than a big group.
  • Depending on their reading ability they can usually read a Bible verse that you have chosen (short and simple).
  • They can use their finger to follow along in their own Bible as the teacher reads


Older Primary School Age (ages 8-10 years)

  • 8-10 Rectangle3Depending on reading level children of this age might be able to read a few verses in a row or even a very short Bible story.  You will have to plan this carefully if children are reading out loud in class.  This can be embarassing for some children and it does take time.
  • Children in this age group can copy verses onto paper.  These can be used in the classroom or taken home as reminders.
  • Children aged 8-10 years are often able to confidently find a verse from a book, chapter, verse reference.  A fun game is for the teacher to call out a reference (like Ephesians 6:1).  The children then “race” to find the verse in their Bible and begin reading.


Pre-Teen (ages 11-12)

  • 11-12 Teaching AgesBy the pre-teen years children can usually read a set of verses or a Bible story of reasonable length from the Bible.
  • A teacher can challenge them to read a verse or set of verses and then:
    • Outline what they have read
    • Point out the most important words and/or
    • Name the characters and describe them based on what they have read.
  • Also guide them to read a verse, group of verses or a Bible story and then describe:
    • What this reading reveals about God
    • How the pre-teen’s thoughts and feelings are affected by what they have read, and/or
    • What actions they might take based on what they have just read.